
How to Add Headers, Footers, and Page Numbers in Microsoft Word
Sometimes you’ve got to make longer documents—such as business reports, school papers, and book-length materials. Microsoft Word headers, footers, and page numbers organize the document and make it easier for your readers to navigate.

Here are a few good reasons to use Microsoft Word headers, footers, and page numbers:
- Find a page in the document. Imagine trying to find a specific passage in a 250-page document without page numbers! Microsoft Word page numbers update automatically as you add or delete pages. Plus, they’re easy to work with. You’ve got no excuse for not using this useful feature.
- Identify what you’re reading. Headers and footers also help the reader situate themselves in the document. For example, a glance at the footer can remind them that they’re reading Chapter 16 of The Greatest Novel Ever Written.
- Brand the document. Branding is another reason to use headers and footers. Add your organization’s name and logo. And, if you export your Word Doc into a PDF, you can even make the headers and footers clickable (or hyperlinked) to your website.
Insert Microsoft Word headers, footers, and page numbers in your document or start with a Microsoft Word template that includes pre-formatted headers, footers, and page numbers. Envato Elements and GraphicRiver are great sources of templates for Microsoft Word.
In this article, you’ll learn how to work with headers, footers, and page numbers in Microsoft Word. So, you and your readers can reap all their benefits. Let’s get started!
Note: I’m on Microsoft Word for Mac version 16.33. The steps may differ slightly depending on what version of Microsoft Word you’re using.
Work With Headers and Footers in MS Word
Adding a Microsoft Word header or footer is quite intuitive. Follow these steps:
1. How to Insert Headers and Footers
To add a header, go to Insert > Header.

Choose the built-in format you want to use from the menu that appears. You’ve got the option of a blank header, a blank header with three columns, or other built-in styles.

Choose the style you wish to use.

Follow the same steps to add a Microsoft Word footer, but click Insert > Footer instead to get started.
2. How to Insert Text in a Header or Footer
Double-click into the header or footer to open it. Replace the placeholder text, if there’s one, with your own. Otherwise, type your text.

Then, format header or footer text to make it look the way you want. Select the text, then click on the Home tab. From there, change the font, font size, color, and other settings.

To close the header or footer, under the Header & Footer tab, click the Close Header and Footer button. Or, double-click outside the header or footer.

Note: When the header or footer is closed, it’s locked and can’t be edited. Double-click on the header or footer section to open the Header & Footer view.
3. How to Insert the Date or Time in a Header or Footer
To add a date or time in a header or footer, click Insert > Date & Time.

The Date and Time dialog opens.

Choose the format you wish you use. Check Update automatically, if you want the date and time to update each time you modify the document.

4. How to Insert a Logo in a Header or Footer
Aside from text, you can also insert images in a Microsoft Word header or footer. This is a good opportunity for you to brand your document by including your logo.
To insert a logo, open the header or footer. Double-click at the top (for header) or bottom (for footer) of the document. In this example, I’m adding a logo in the footer.
Click Insert > Pictures > Photo Browser.

Locate the logo on your computer, select the file, then click Insert.
The logo is now in the footer.
Double-click outside the footer or click on the Close Header and Footer button in the ribbon to close it.
Work With Microsoft Word Page Numbers
Page numbers are a common element to include in either the header or footer of your document. To learn how to number pages in Microsoft Word, follow these instructions:
1. How to Insert Page Numbers to a Header or Footer in Word
With the header or footer open, click Insert > Page Numbers ….

The Page Numbers dialog opens:

Select the settings you want to use. Decide on the page number’s position and alignment.
There’s also a radio button to Show number on first page. By default, this button is unchecked. This means the first page of your document can be its cover, and the page number won’t be displayed on it. If you want the page number to appear on the first page, check this button.
From here, you can also change the format of the page numbers. With the Header & Footer tab open, click Page Number > Format Page Numbers ….

This opens the page numbering format box, where you can make other settings:
- Number format allows you to choose from Roman numerals or Arabic numerals or letters
- Include chapter number, if you’ve set up chapters in your document and want to include them in the page numbering, then check this button.
- Page numbering
- Continue from previous section continues the page count from the previous page.
- Start at ___ lets you restart the page count at any number.
After making your settings, click OK to apply.
2. How to Make Page Numbering Not Appear on the First Page
If you want the first page of your document or section to be the cover page, then you wouldn’t want it to have a page number. To hide the page number from the first page of a document or section, do the following:
Click Insert > Page Numbers ….
The Page Numbers dialog opens. Uncheck the Show number on first page radio button.

Click OK.
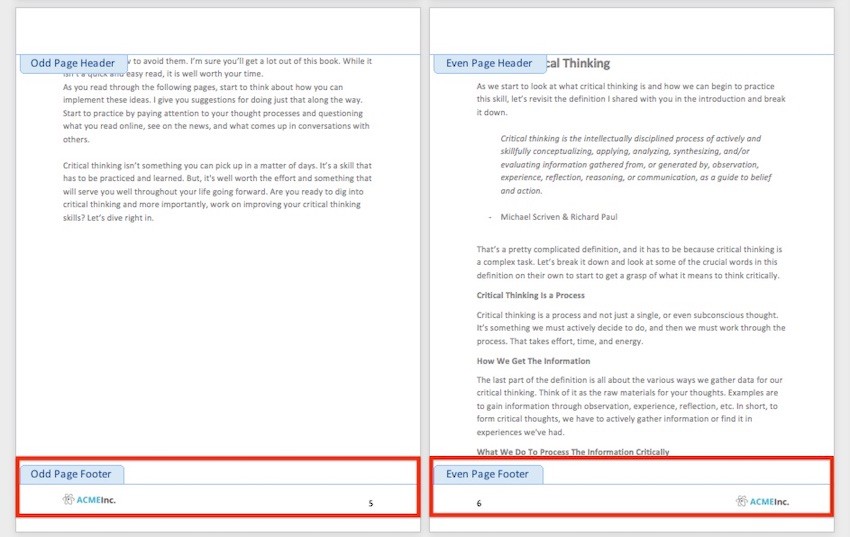
3. How to Number Odd and Even Pages Differently
By default, headers and footers appear the same way on odd and even pages, like this:

But sometimes, you may want odd and even pages to appear differently. An example is in the case of books or magazines, where you want the page number to be on the outer edge of the spread when the (printed) document is open.
This is possible in Microsoft Word, where you can format headers, footers, and page numbers differently on odd and even pages.
To do this, double-click inside the header or footer. This opens the Header & Footer ribbon. Check the button for Different Odd & Even Pages.

Edit your odd and even headers/footers separately. When you’re done, double-click outside the header/footer to close.
Now, the positions of the logo and page numbers are different for odd and even pages on my document:

4. How to Add Different Numbers and Formats to Different Sections
You can also use different page numbers and formats for different sections of your document. For example, in my document I want the page numbers in the Introduction section to be Roman numerals.
First, make sure you’ve broken your document into sections.
To define a new section, place the cursor where you want a new section to begin. Then, click Insert > Break > Section Break. Choose whether you want the section to begin on the next page, continue on the same page as the previous section, or begin on either an odd or even page.

In this example, I inserted section breaks before and after the Introduction to make it a separate section from the rest of my document.
To double check if you’ve inserted section breaks where you want them, click on the Show/Hide Paragraph button on the ribbon. This displays how your document into paragraphs as well as sections.

Now, you’re ready to format the page numbers in a specific section.
Double-click in the footer part of the page to open the Header & Footer view. Click inside the footer you want to format.
On the Header & Footer ribbon, click Page Number > Format Page Numbers.

Change the format to the settings you wish to use.

Click OK.
5. How to Control Page Numbers Using Fields
So far, we’ve been using Microsoft Word’s built-in formats for page numbers. For more control over how the page numbers display, use fields.
Double-click on the top or bottom of page to open the Header & Footer view. In the header or footer, place the cursor where you want to insert the page number.
From the Header & Footer ribbon, click on the Field button.

The Field dialog box opens. To add a page number, scroll down Categories, and select Numbering. Then, under Field names, select Page.

Click Options to change the number formatting. Make the selections you want to use, then click OK.
6. How to Fix Broken Page Numbers
Sometimes as the document gets larger and new pages and sections are added, page numbering can break. Below are two common page number errors and how to fix them.
Example 1: Page number starts over at 1 in the middle of the document
This can happen when you’ve defined a section, formatted its page number to restart at 1, then inserted a section break again.
Solution:
Examine the section breaks in your document by clicking on the Show/Hide Paragraph button.
Check how the page numbers are formatted in the section, and make sure to uncheck Start at:___.

Example 2: Word is counting the cover page as page 1
The first page of the document is usually the cover page as well. Naturally, we don’t want it to be included in the page count. But what if your document does? Here’s one way to fix that.
Solution:
Insert a section break after the cover: click Insert > Break > Section break. Select one of the options that appear.
Check the button for Different First Page.

On the page where you want the page count to begin, go to Page Number > Format Page Numbers. Check the radio button for Start at:___. Type the page number that you want the page count to begin at.

Work With Templates With Header and Footer Designs for Microsoft Word
If you’d rather not make any design and formatting decisions, the easiest thing to do is to start with a Microsoft Word template. A good template comes with header, footer, and page numbers all pre-formatted. These will automatically update as you add or remove pages.
Select a Word template like this e-book template for Microsoft Word that I found in Envato Elements.

If you want to edit the header, footer, or page number, click into the header/footer to open it. Make the changes you want to make following the relevant steps above.

When you’re done, double-click outside the header/footer to close it.
Work With Other Header Options and Change Designs
Microsoft Word headers and footers also come with built-in designs for you to choose from.
To select one, click in the header or footer. Click the Header or Footer button on the ribbon. Scroll down to see all the available options. Choose a design from the selections that appear.

Note: This will override any header or footer and page number settings you’ve already made.
Use Microsoft Word Header, Footer, and Page Numbers to Give Readers a Good Experience
By following the steps in this article, even beginning users of Microsoft Word can add headers, footers, and page numbers in their documents. Or, if you’d rather not worry about formatting these page elements, use a Microsoft Word template instead of starting from scratch.
Whether creating your own layout or starting with a template, Microsoft Word headers, footers, and page numbers help you provide a better experience for your readers. They’ll be able to more easily navigate the document and find the pages or sections they need.
You can also make the most of headers and footers to brand the document. Add your logo and organization name, as well as the author’s name, to increase brand recognition and establish your thought leadership.
What are your tips for using Word in long documents? Leave a comment and let us know.